Today is Day 2 of summer vacation, a teaching hiatus that will be short lived as I return to work this summer in a week, and in typical Cajun Cowgirl style, I managed to remain off the couch and thus actually relaxing and instead chose to test my creative juices, taking on a project this novice was not equipped neither with the mental patience nor the kitchen equipment to accomplish.
Despite possible ridicule and the defeat suffered today, I will send your way the recipe and tips learned the hard way, food porn included.
John Wooden observed, "Sports do not build character...They reveal it," and if sous cheffing (yes, I just verbed a noun) in my kitchen today, Wooden would surely change his quotable quip to "Ladybug Cake Pops do not build character...They reveal it."
Bakerella is my cake pop hero; be sure to check out her not only delicious nuggets of tummy happiness, but also observe the aesthetic appeal of her treats. The cake pop itself is cake flavor of choice, mixed with icing flavor of choice, and covered with melted chocolate flavor of choice--a winning combination alone. It's in the creative design and subsequent execution where greatness happens.
What follows is a peek into my character building couple of days.
I have to admit that I'm becoming quite the expert in the creation of the cake pop, and I want to produce my own decorating magic instead of relying on Bakerella to first provide the ideas, hence the ladybugs. I checked out pictures of full cakes and cupcakes for ideas and decided that I was ready.

Ingredients:
1. Dark fudge cake mix
2. White chocolate bark
3. Cream cheese icing
4. Black Twizzlers for antenna
5. Food coloring
6. Chocolate chips for dots and eyes
I figured you can't go wrong with Oreos, so what better cake pop combo than the fudge cake and cream cheese icing. (I also had a container of the icing already in the cabinet--shhh...our secret.)
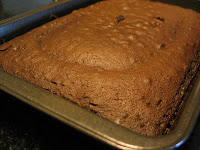
 With the cake baked and cooled, it was time for the genius part of this mission to kick in. I'm still waiting. Nevertheless, let's proceed.
 With your hands combine the icing and broken up cake in a large bowl. Be sure that the mixture is fully blended. Apologies for no picture here; perhaps next time I will set up the correct angle and self-timer to fully capture each step for those bothered by such photography.
Place this mixture into the icebox or even freezer to cool further as this will make shaping easier.
When cold, yet not frozen, shape your pops. Again, I'm not sure what happened to my picture-snapping at this point, but I made larger balls for the body of the ladybug an
 d smaller ones for the heads. I planned to use melted chocolate to stick them together once both were covered and cooled. Perhaps next round I may just shape them into one pop and find a way to cover in chocolate colors accordingly. Perhaps something more like these.
After freezing both sets of rolled cake, I was ready to dunk these in the chocolate and commence decorating.
ROADBLOCK--apparently one cannot use regular food coloring (or any with water as an ingredient) as it will harden the chocolate. After a small amount of grumbling as it was already after dinner and I wanted to work on this project yet NOT hit the store, I recovered my character and attacked in the morning.
My trip to Michael's was quite productive. A bag of (too expensive) black M&Ms, white gel for the eyes, and appropriate candy melting food coloring later, I returned home feeling fully prepared and excited that I could use the black M&Ms instead of brown, upside-down chocolate chips. Confidence hit its pinnacle.


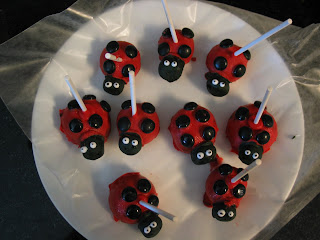
 My Ladies began taking shape, well, partially. Here our tale takes a turn. Aren't the heads cute with the Twizzlers cut and inserted? Do they look a bit green?
I agree. Heads were cute until I realized when I went to attach them that I placed the antenna in the wrong spot. Check the final product closely for the holes created once I removed these. (And I was so proud of that idea! Next time, my execution will be pristine.)
Further, following Internet advice to add blue coloring to melted brown chocolate to create the black needed for the heads did not fully work out for me, although in looking back at the pictures, the color isn't too bad. For Round 1, ok; my next attempt may undertake a break into the world of fondant.
Regardless, may I introduce my Summer Ladies (some pops, some crawlers, some semi-decent, some not, all bringing out the best in my creativity and passion to perform better next time):


Lessons Learned:
1. Mini M&Ms perhaps (although I am not sure of the availability of mini black ones)
2. Fondant for for black circles, head, and eyes. The gel icing does not dry and actually (as final picture shows) starts to drip leaving quite the wide-eyed bug.
3. My craft/project personality is of the about an hour or two variety.

4 comments:
I'm sorry, but those might be the cutest lady bug pops I have ever seen in my entire life... granted, I haven't seen many, but I just know those are the absolute BEST! Seriously.
Love you!
Suzanne, you are my favorite! Can't wait to see you soon!
those ladybugs are way too cute! btw, jonas says if you keep baking like this, then we have to move back to houston!
I have to say that I love your ladybug pops and thanks for the food porn. I tend to not try things without pics to show me step by step. I think you just boosted my confidence to try these for my daughters 1st b-day party.
Post a Comment