
This week I'm sharing a project a long time in the making. Let's just say that some of y'all are great with spray paint. I, my friends, am not.
I've pinned several ideas for displaying The Sheriff's masterpieces in our breakfast room/creative space.
The inspiration I chose:
 |
| Source: littlenannygoat.blogspot.com via Jennifer on Pinterest |
I love the simplicity of these frames and their versatility. I could easily hang pictures instead of insert-letter-of-the-week projects.
Creating these little guys proved a bit more difficult. The process itself is not, but I could not settle on a paint color and a few cans of spray paint later, I'm finally finished. I am sure these won't last forever, but I like them in the now and am thankful for a place to hang out artwork instead of simply taping it to the wall haphazardly.
Exhibit A:
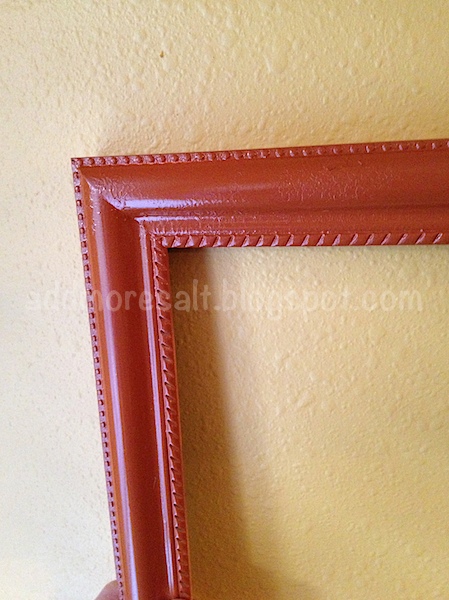
That color looks nothing like the can. Ok, maybe a little but it's a lot of orange and on our yellow walls, three frames that color would look like Halloween threw up all over it.
Here's what you'll need:
*Frames to paint (I used three cheap ones from Walmart. When checking out the cashier asked, "You gonna put pictures of yourself in these?" I kindly explained that I was not displaying 3 large pictures of myself in 11 x14 frames (I think they are that big) but instead would be crafting. She really didn't care so I shut up quickly. Then she opened my shampoo, smelled it, and commented on it. Not ok.)
*1/2-1 yard of burlap (depends on how large your frames are). I can see these are big wall displays or as smaller picture display frames as well.
*Tiny clothespins (or magnetic clips as seen on the original)
*Spray paint (which I've resorted to buying at Walmart. Hobby Lobby's spray paint security routine is overkill. Seriously, what teenager with a mischievous agenda is going to look to Hobby Lobby for his spray painting needs?)
*Hot glue gun (and I'm only putting parentheses here because all of the other materials listed have them and it would feel out of place not to!)
1. Spray paint your frames, maybe with 3 different colors. Do what it takes. I didn't take pictures of this step but was instead too busy trying to keep my grits! Apparently TX heat also causes spray paint to web upon contact.
2. Cut the burlap to wrap around the backing of your frame. Fold around and hot glue down.


3. Hot glue the covered backing to the back of the picture frame. With the burlap the cardboard would not fit back into the slots so I just hot glued the mess out of it around the sides. (You can see the various spray paint colors of the back of my frame.)

4. Glue your clip to the center of the frames. Again, no pic.

5. Bug someone to help you hang your creation. I hadn't considered the L-shape that we ended up with, but rolled with J's idea. I actually wish I had one more frame for this arrangement.


Like I mentioned, the worst part of this project was choosing a paint color, and I blame that on our bright walls. I'd consider making these again to use as photo holders in a bedroom with neutral walls, and I could play a bit more with the frame color which was my original intention.
Thanks for a great link-up AP!
12 comments:
These look great!
Love those colours together! We have red walls in our Living room and I always have a hard time deciding what colours to accent with :)
I'm looking forward to making these for our future playroom!
Those look great! I should make a few for my little area in our playroom.
Wow this is a great idea! I really love this...I need to have you make me some and send them my way :)
1. pretty sure you just thought of a much better name for this link up.
2. i cannot get over the cashier smelling your shampoo. that is HILARIOUS. i'd have been all WTF are you doing?!
3. i LOVE these! you know me, i'm a sucker for ANYTHING that involves burlap! they look so great!
I LOVE these and am so going to try this in our playroom!
I just happen to have some extra burlap, frames & spray paint laying around. I might just have to add this to my list!
Stopping by from the link up!
These are great! I love using frames for things, there are so many wonderful ideas that I've been seeing and look forward to implementing them sometime in the future, hehe :) I am cracking up at the questions the cashier asked! ;)
LOVE this idea---great job!!!!
Julie
www.thechirpingmoms.com
Creat idea! :) Also, that orange was like way too much orange even for me! :)
Nice work! I like the colors- very much! I will have to try this. Maybe make a large one with multiple clothes pins, because I fear after spray painting one small one there would be no more and the project would be ruined. Yes one large one- I must try!
Love these. Turned out great!!!
Post a Comment